A taste of glu (tutorial)
The purpose of this tutorial is to give you a taste of glu: the idea is to be up and running as quickly as possible and try it for yourself so that you get a feel of what glu can do.
Note
For the sake of this tutorial, the agent and the console are all running on the same host. This is not the production case where there is 1 agent per host with a central console to command them.
During this tutorial you are going to deploy 3 jetty containers running 4 webapps!
Note
Note that this tutorial will launch several applications on the following ports so make sure nothing is running on them or you will encounter some issues:
agent:    12906
console:   8080
webapp1:   9000
webapp2:   9001
webapp3:   9003
zookeeper: 2181
Requirements
Currently glu requires a UNIX like platform (tested on Mac OS X) and the following version of java:
| glu version | java version(s) |
|---|---|
| 5.6.0+ | java 1.7 or java 1.8 |
| 5.0.0 - 5.5.x | java 1.7 |
| 4.7.x | java 1.6 (any VM) or java 1.7 |
| 4.6.x and below | java 1.6 (with Sun/Oracle VM only!) |
Warning
Due to a bug with OpenJDK glu prior to 4.7.0 requires the Sun Java VM.
Install the tutorial
Download the binary called <version>/org.linkedin.glu.packaging-all-<version>.tgz from bintray glu repository.
Untar/Unzip in a location of your choice.
Note
From now on, this location will be referred to as GLU_HOME.
Start all components
In a shell terminal enter:
cd $GLU_HOME
./bin/tutorial.sh start
./bin/tutorial.sh tail
The first command does the following:
using the meta model ($GLU_HOME/models/tutorial/glu-meta-model.json.groovy), it generates the various components and configures them for the turorial:
- 1 agent (agent-1) running on localhost (port 12906). agent-1 is configured to be part of the glu-dev-1 fabric.
- 1 console running on localhost (port 8080) (the console contains the orchestration engine)
- 1 ZooKeeper instance running on localhost (port 2181)
then it starts the (3) components previously generated and configured
The second command tails the log for each component.
Tip
The console includes this documentation as well, available at http://localhost:8080/glu/docs/html/tutorial.html
Note
The setup command has created a new directory $GLU_HOME/tutorial which will be now referred to as GLU_TUTORIAL_HOME. Once you are done with the tutorial (and you have stopped all components), it is safe to delete this directory as it is easy to regenerate it. You may also generate the tutorial in another location if you want to:
./bin/tutorial.sh -d /tmp/tutorial start
./bin/tutorial.sh -d /tmp/tutorial tail
Login to the console
Point your browser to http://localhost:8080/console
Note
Depending on the speed of your system, it may take a little while for all the components to be started. You will know when you see the Console started. message in the tailed log file.
login:
username: admin
password: admin
Note
The very first time the console is started, an admin account is created. In production mode, it is highly recommended to change the default password!
View the agent
- Click on the 'Agents' tab where you will see a list of all agents (nodes). In this case there should be only 1 entry.
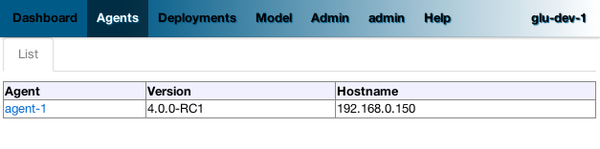
- Click on agent-1 (which is the name of the agent that was previously set up)
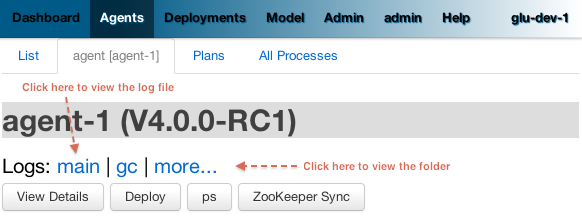
- Click on 'View Details' which show/hide the details about the agent: this information is coming straight from agent-1 which was registered in ZooKeeper when the agent started.
- You should see the properties glu.agent.port (12906) and glu.agent.pid representing the pid of the agent.

View log files
- Click on 'main' (next to Logs:) which (dynamically) tail the main log file of the agent (you should see the same message that the tail command (started previously) is showing).
Note
the agent logs a message that you are looking at its log file!
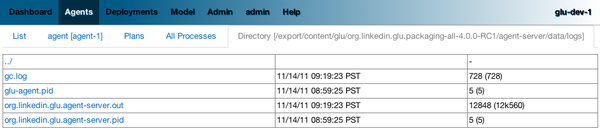
- Go back to the agent view page and click 'more...' (next to Logs:). This will show you the content of the logs folder and you can navigate to look at any file you want!
Note
All those operations are executed on the agent(s) and the console merely displays the result (as can be seen in the log file of the agent).
View processes (ps)
- Click on the 'All Processes' subtab. This essentialy runs the 'ps' command on the agent and returns the result.
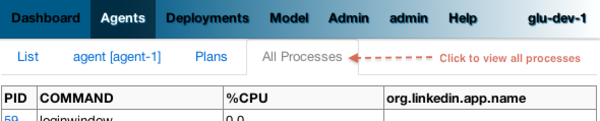

- In the org.linkedin.app.name column you should be able to identify the agent that is running (as well as zookeeper and the console itself). By clicking on the pid you can view details about the process as well as sending a signal to the process!
Note
All those operations are executed on the agent(s) and the console merely displays the result (as can be seen in the log file of the agent).
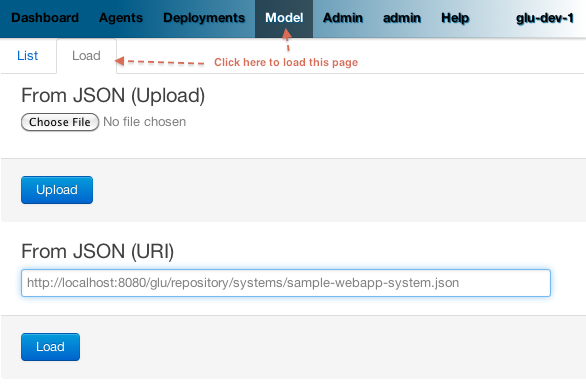
Loading the model
Click on the 'Model' tab and 'Load' subtab and enter:
Json Uri: http://localhost:8080/glu/repository/systems/sample-webapp-system.json
Click Load.
Note
the console is a simple web application and is being run in a jetty container which is also used to serve static content. In a production environment it is usually not the way it is being done as the agents would not in general talk to the console but instead would fetch their information from a binary repository (like Artifactory) using the ivy protocol for example.
Note
you can view the model you just loaded at http://localhost:8080/glu/repository/systems/sample-webapp-system.json (you may need to do ‘View Source’ in your browser if you don’t see anything).
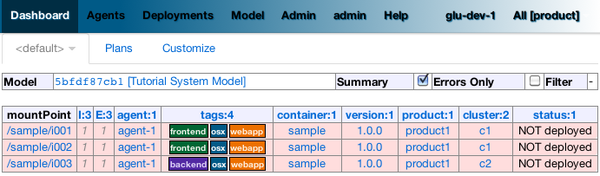
Fixing the issues
After loading the model you should be back on the Dashboard view with 3 red rows in the table. The status of each row reads: 'NOT deployed'.
Note
From there, there are several ways to go about it (partially or all at once). Let’s do it all for now.
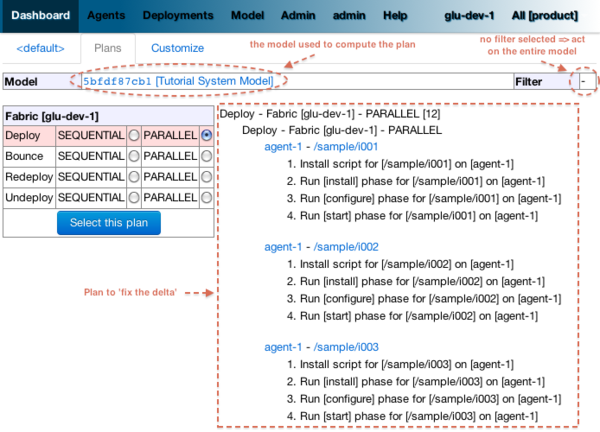
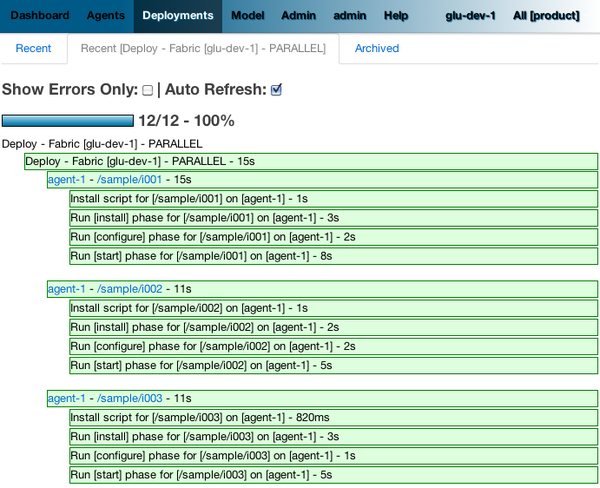
Click on the 'Plans' subtab. You should see a table at the bottom of the page with Select a plan right next to it. Select the radio group control in the table that says Deploy PARALLEL (the row should be highlighted in red). It should immediately shows you the list of actions (and their ordering) that are going to be accomplished to ‘fix’ the delta.
Click 'Select this plan'.
The next page allows you to customize the plan. Simply click 'Execute' and confirm the action.
The next page will show you the plan again and will change as the plan gets executed. Since you selected PARALLEL all the actions will take place in parallel. The plan should conclude successfully.
Note
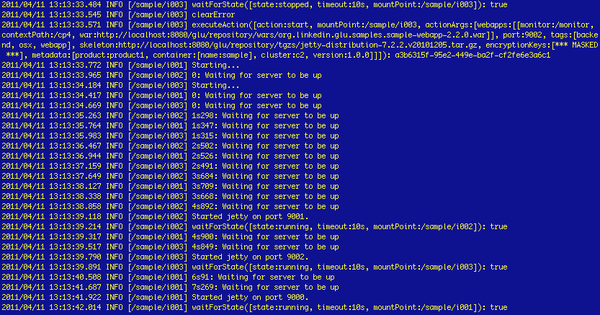
At this stage you can check the tail command output and see all the activity.
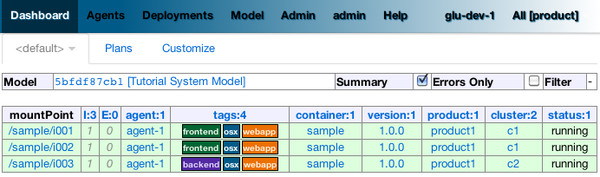
Go back to the Dashboard and everything should be green.
Note
the terminology ‘entry’ may sound a little vague right now, but it is associated to a unique mountPoint (or unique key) like /sample/i001 on an agent with a script (called glu script) which represents the set of instructions necessary to start an application. In the course of this tutorial we use the JettyGluScript which starts a jetty webapp container and deploy some webapps in it.
At this stage you have just started 3 jetty container with 4 webapps and you can verify that it worked:
webapp1: /sample/i001 (port 9000)
   /cp1: http://localhost:9000/cp1/monitor
   /cp2: http://localhost:9000/cp2/monitor

webapp2: /sample/i002 (port 9001)
   /cp1: http://localhost:9001/cp1/monitor

webapp3: /sample/i003 (port 9002)
   /cp4: http://localhost:9002/cp4/monitor
Viewing entry details
Let’s go back to the page that shows you the details about the agent. For this you can either click on the 'Agents' tab and select 'agent-1' from the list, like you did in a previous step or you can simply click on the little magnifying glass that is displayed on the dashboard right next to the name of the agent (agent-1).
The page shows you now the 3 entries that were installed.
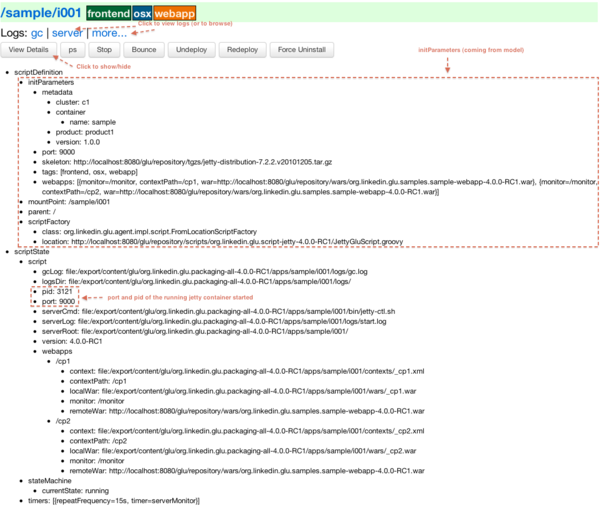
Under /sample/i001 click the 'View Details' link to show/hide details about the entry.
You should see a section called initParameters which is coming directly from the system model that you loaded.
You should also see a section called scriptState which shows various information like the port (9000) or the pid of the process that was started or the location of the log files.
Note also that under every entry, there is a Logs: section which allows you to access the log file of the specific container directly, including the gc log file.
Detecting failures
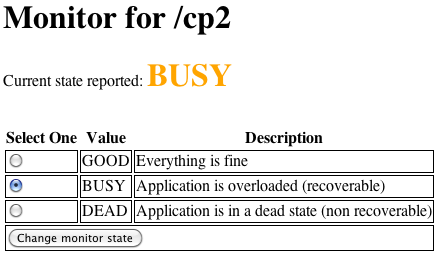
In another browser window, go to the monitor page for the first entry (/sample/i001): http://localhost:9000/cp2/monitor
Select BUSY and click Change monitor state. By doing this, we are simulating the fact that the webapp has detected that it is overloaded and not responding.
2 things should happen (it may take up to 15 seconds to detect the failure):
in the agent log file (look at the tail command you ran previously), you should see something like:
2011/01/11 14:57:21.140 WARN [/sample/i001] Server is up but some webapps are busy. Check the log file for errors.
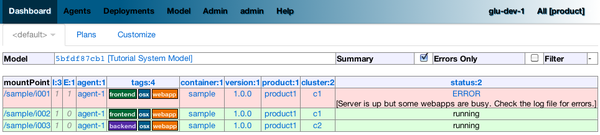
on the Dashboard, the first row should be red and the status should read: ERROR. If you click on ERROR you should see the same message you just saw in the agent log file:
Server is up but some webapps are busy. Check the log file for errors.
Now go back to the monitor page, select GOOD and click Change monitor state.
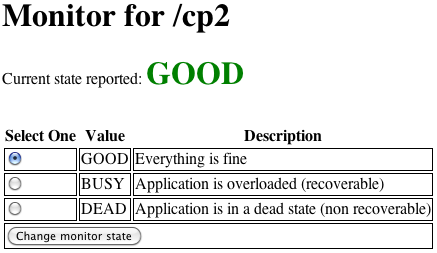
Again 2 things should happen (within 15 seconds at most):
in the agent log file, you should see something like:
2011/01/11 15:03:57.082 INFO [/sample/i001] All webapps are up, clearing error status.
on the Dashboard, everything should be back to green.
Changing the model
Now click the 'Model' tab again.
You should see a table with 2 entries which shows you the model that you loaded previously (the one highlighted) as well as the empty model (default one when creating a fabric)
Click on the first id. You should now see the json document that you loaded previously. We are going to edit it in place.
The format is an array of entries representing each entry in the model (as explained previously).
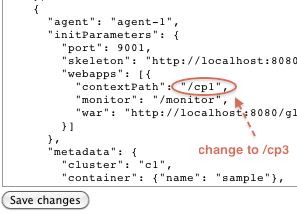
In the second entry (look for "port": 9001, around the bottom of the text area), change the contextPath value to /cp3. and click "Save Changes".
Go back to the Dashboard.
Note that the second row is now yellow and the status says 'DELTA'. If you click on the status you can view an explanation of the delta (in this case the context path is different).
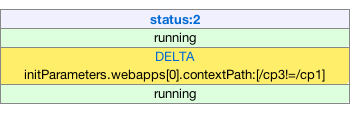
There is a delta: the system in the console is not matching with what is currently deployed. It is graphically represented as a different color.
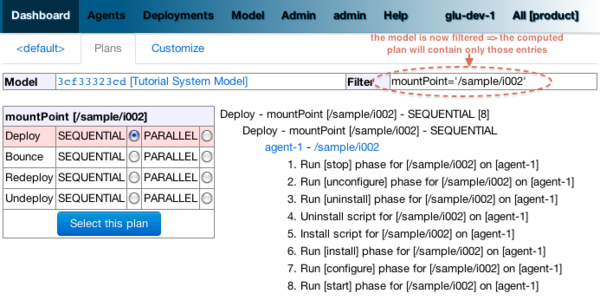
Click on '/sample/i002' which sets a filter on the model: it excludes all the entries except the one where 'mountPoint' is equal to '/sample/i002'. Click on the 'Plans' subtab.
Choose 'Deploy / SEQUENTIAL'. Note that since there is only 1 entry, choosing SEQUENTIAL or PARALLEL will have the same effect.
Select the plan and execute it: it first stops the jetty server uninstalls it entirely and reinstall and restart the new one.
When the plan finishes executing, click on /sample/i002 which is a shortcut to the agent view page.
If you click on 'View Details' (for /sample/i002), you should see the new context path and you can check that it did work by going to: http://localhost:9001/cp3/monitor
Now the system (also known as desired state) and the current state match. There is no delta anymore so the console is happy: everything is green.
Reloading the model and experiencing a failure
Manually edit the file: $GLU_TUTORIAL_HOME/console-server/glu/repository/systems/sample-webapp-system.json
Change the contextPath in the very last entry from /cp4 to /fail and change the name of the model to Tutorial System Model (with failure) and save your changes (it will make it easier to differentiate the model in the UI by giving it a different name).
Go back to the console and reload the model:
Click on the 'Model' tab, 'Load' subtab and enter:
Json Uri: http://localhost:8080/glu/repository/systems/sample-webapp-system.json
and click Load.
Note
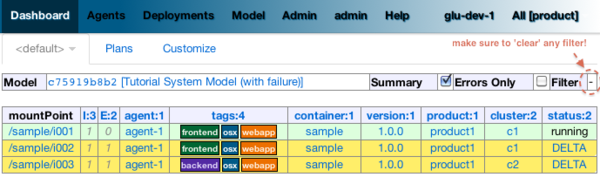
When you go back to the model, the filter you set previously will still be active. Make sure you click the 'X' right next to it to remove it and see the whole, unfiltered model! You should now have 2 rows that are yellow: you reloaded the model thus discarding the changes you had made to entry 2 and you changed entry 3.
Click on the 'Plans' subtab and follow the same steps we executed before to ‘fix’ the delta (select deploy in parallel and then execute the plan).
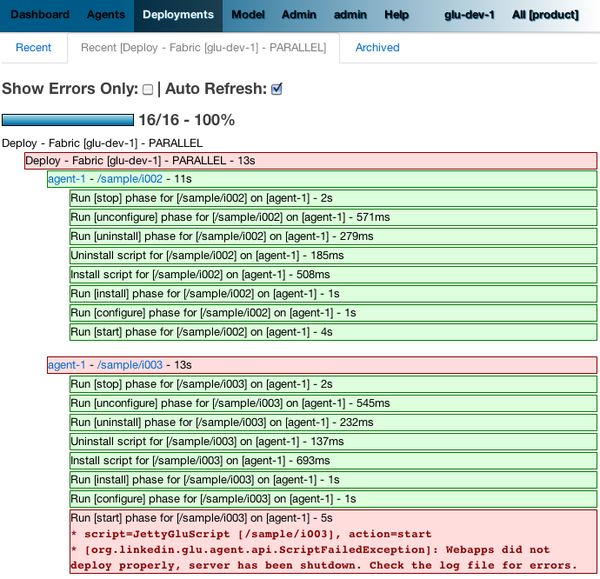
This time around you should see a failure: the last entry failed during boot time (this is artificially triggered by deploying it under /fail).
Note
Since the plan is executing in parallel, the failure does not impact the rest of the deployment plan. When the plan is executed sequentially, any failure will prevent the execution of the following steps.
Click on the shortcut /sample/i003 and on the agent view page select the Logs: more... entry for /sample/i003 then click on the first log file called <yyyy_mm_dd>.stderrout.log. You should be able to see the log file of the jetty container with the exception of why it failed (something similar to):
java.lang.RuntimeException: does not boot
  at org.linkedin.glu.samples.webapp.SampleListener.contextInitialized(SampleListener.java:45)
...
Using the console cli
Click on the 'Model' tab and set as current the very first model you loaded (it should be right above the Empty System Model one).
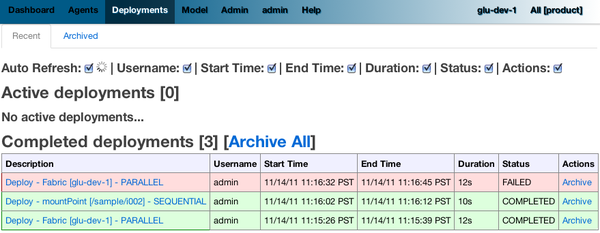
In the console, click on the 'Deployments' tab and make sure you leave this window visible. Note that at this point you should see the list of all the plans you have already executed including the last one which failed.
Now open a new shell terminal
Note
if you have followed all the instructions so far, you should have a shell terminal window with the tail command in it, this is why we need to open a new one.
Go to the root directory:
cd $GLU_TUTORIAL_HOME # $GLU_HOME/tutorial
Now issue the following command (-b is to make it more readable):
./bin/console-cli.sh -f glu-dev-1 -u admin -x admin -b status
which will display the model that is currently loaded in the console and:
./bin/console-cli.sh -f glu-dev-1 -u admin -x admin -b -l status
which will display the current live model (note that you get a scriptState section similar to the one you can see in the console when clicking on the View Details link for an entry).
Now we are going to redeploy everything in parallel by issuing:
./bin/console-cli.sh -f glu-dev-1 -u admin -x admin -a -p redeploy
Please pay attention to the following:
in the shell window in which you just issued the command there will be a progress bar

in your web browser you should also see the plan appearing with a progress bar (you can click on the plan to see the details)

in the shell window with the tail you should see the ouput of the execution
The plan will succeed and you should see:
100:COMPLETED
unless you did not change the context path to /cp4 (you may want to try reverting the model to /fail as an exercise...).
Try a dry-run mode (-n):
./bin/console-cli.sh -f glu-dev-1 -u admin -x admin -a -n -p redeploy
which will display an xml representation of the plan that would be executed if you remove the -n option. You should see the 3 entries in the xml output:
<?xml version="1.0"?>
<plan fabric="glu-dev-1" systemId="deeab8468ddbead277ba86ee2f361ba3a13eefd4" origin="rest" action="redeploy" filter="all" name="origin=rest - action=redeploy - filter=all - PARALLEL" savedTime="1308603147004">
  <parallel origin="rest" action="redeploy" filter="all">
    <sequential agent="agent-1" mountPoint="/sample/i001">
      <leaf agent="agent-1" fabric="glu-dev-1" mountPoint="/sample/i001" name="Run [stop] phase for [/sample/i001] on [agent-1]" scriptAction="stop" toState="stopped" />
      <leaf agent="agent-1" fabric="glu-dev-1" mountPoint="/sample/i001" name="Run [unconfigure] phase for [/sample/i001] on [agent-1]" scriptAction="unconfigure" toState="installed" />
      <leaf agent="agent-1" fabric="glu-dev-1" mountPoint="/sample/i001" name="Run [uninstall] phase for [/sample/i001] on [agent-1]" scriptAction="uninstall" toState="NONE" />
      <leaf agent="agent-1" fabric="glu-dev-1" mountPoint="/sample/i001" name="Uninstall script for [/sample/i001] on [agent-1]" scriptLifecycle="uninstallScript" />
      <leaf agent="agent-1" fabric="glu-dev-1" initParameters="{metadata={product=product1, container={name=sample}, cluster=c1, version=1.0.0}, port=9000, skeleton=http://localhost:8080/glu/repository/tgzs/jetty-distribution-7.2.2.v20101205.tar.gz, tags=[frontend, osx, webapp], webapps=[{monitor=/monitor, contextPath=/cp1, war=http://localhost:8080/glu/repository/wars/org.linkedin.glu.samples.sample-webapp-3.0.0.war}, {monitor=/monitor, contextPath=/cp2, war=http://localhost:8080/glu/repository/wars/org.linkedin.glu.samples.sample-webapp-3.0.0.war}]}"
            mountPoint="/sample/i001" name="Install script for [/sample/i001] on [agent-1]" script="http://localhost:8080/glu/repository/scripts/org.linkedin.glu.script-jetty-3.0.0/JettyGluScript.groovy" scriptLifecycle="installScript" />
      <leaf agent="agent-1" fabric="glu-dev-1" mountPoint="/sample/i001" name="Run [install] phase for [/sample/i001] on [agent-1]" scriptAction="install" toState="installed" />
      <leaf agent="agent-1" fabric="glu-dev-1" mountPoint="/sample/i001" name="Run [configure] phase for [/sample/i001] on [agent-1]" scriptAction="configure" toState="stopped" />
      <leaf agent="agent-1" fabric="glu-dev-1" mountPoint="/sample/i001" name="Run [start] phase for [/sample/i001] on [agent-1]" scriptAction="start" toState="running" />
    </sequential>
    <sequential agent="agent-1" mountPoint="/sample/i002">
      <leaf agent="agent-1" fabric="glu-dev-1" mountPoint="/sample/i002" name="Run [stop] phase for [/sample/i002] on [agent-1]" scriptAction="stop" toState="stopped" />
      <leaf agent="agent-1" fabric="glu-dev-1" mountPoint="/sample/i002" name="Run [unconfigure] phase for [/sample/i002] on [agent-1]" scriptAction="unconfigure" toState="installed" />
      <leaf agent="agent-1" fabric="glu-dev-1" mountPoint="/sample/i002" name="Run [uninstall] phase for [/sample/i002] on [agent-1]" scriptAction="uninstall" toState="NONE" />
      <leaf agent="agent-1" fabric="glu-dev-1" mountPoint="/sample/i002" name="Uninstall script for [/sample/i002] on [agent-1]" scriptLifecycle="uninstallScript" />
      <leaf agent="agent-1" fabric="glu-dev-1" initParameters="{metadata={product=product1, container={name=sample}, cluster=c1, version=1.0.0}, port=9001, skeleton=http://localhost:8080/glu/repository/tgzs/jetty-distribution-7.2.2.v20101205.tar.gz, tags=[frontend, osx, webapp], webapps=[{monitor=/monitor, contextPath=/cp1, war=http://localhost:8080/glu/repository/wars/org.linkedin.glu.samples.sample-webapp-3.0.0.war}]}"
            mountPoint="/sample/i002" name="Install script for [/sample/i002] on [agent-1]" script="http://localhost:8080/glu/repository/scripts/org.linkedin.glu.script-jetty-3.0.0/JettyGluScript.groovy" scriptLifecycle="installScript" />
      <leaf agent="agent-1" fabric="glu-dev-1" mountPoint="/sample/i002" name="Run [install] phase for [/sample/i002] on [agent-1]" scriptAction="install" toState="installed" />
      <leaf agent="agent-1" fabric="glu-dev-1" mountPoint="/sample/i002" name="Run [configure] phase for [/sample/i002] on [agent-1]" scriptAction="configure" toState="stopped" />
      <leaf agent="agent-1" fabric="glu-dev-1" mountPoint="/sample/i002" name="Run [start] phase for [/sample/i002] on [agent-1]" scriptAction="start" toState="running" />
    </sequential>
    <sequential agent="agent-1" mountPoint="/sample/i003">
      <leaf agent="agent-1" fabric="glu-dev-1" mountPoint="/sample/i003" name="Run [stop] phase for [/sample/i003] on [agent-1]" scriptAction="stop" toState="stopped" />
      <leaf agent="agent-1" fabric="glu-dev-1" mountPoint="/sample/i003" name="Run [unconfigure] phase for [/sample/i003] on [agent-1]" scriptAction="unconfigure" toState="installed" />
      <leaf agent="agent-1" fabric="glu-dev-1" mountPoint="/sample/i003" name="Run [uninstall] phase for [/sample/i003] on [agent-1]" scriptAction="uninstall" toState="NONE" />
      <leaf agent="agent-1" fabric="glu-dev-1" mountPoint="/sample/i003" name="Uninstall script for [/sample/i003] on [agent-1]" scriptLifecycle="uninstallScript" />
      <leaf agent="agent-1" fabric="glu-dev-1" initParameters="{metadata={product=product1, container={name=sample}, cluster=c2, version=1.0.0}, port=9002, skeleton=http://localhost:8080/glu/repository/tgzs/jetty-distribution-7.2.2.v20101205.tar.gz, tags=[backend, osx, webapp], webapps=[{monitor=/monitor, contextPath=/cp4, war=http://localhost:8080/glu/repository/wars/org.linkedin.glu.samples.sample-webapp-3.0.0.war}]}"
            mountPoint="/sample/i003" name="Install script for [/sample/i003] on [agent-1]" script="http://localhost:8080/glu/repository/scripts/org.linkedin.glu.script-jetty-3.0.0/JettyGluScript.groovy" scriptLifecycle="installScript" />
      <leaf agent="agent-1" fabric="glu-dev-1" mountPoint="/sample/i003" name="Run [install] phase for [/sample/i003] on [agent-1]" scriptAction="install" toState="installed" />
      <leaf agent="agent-1" fabric="glu-dev-1" mountPoint="/sample/i003" name="Run [configure] phase for [/sample/i003] on [agent-1]" scriptAction="configure" toState="stopped" />
      <leaf agent="agent-1" fabric="glu-dev-1" mountPoint="/sample/i003" name="Run [start] phase for [/sample/i003] on [agent-1]" scriptAction="start" toState="running" />
    </sequential>
  </parallel>
</plan>
Now try with a filter:
./bin/console-cli.sh -f glu-dev-1 -u admin -x admin -n -p -s "metadata.cluster='c1'" redeploy
You should now see only 2 entries because the first two have been tagged c1 for the cluster and the last one is tagged c2 and we are applying a filter which selects only the entries in cluster c1:
<?xml version="1.0"?>
<plan fabric="glu-dev-1" systemId="deeab8468ddbead277ba86ee2f361ba3a13eefd4" origin="rest" action="redeploy" filter="metadata.cluster='c1'" name="origin=rest - action=redeploy - filter=metadata.cluster='c1' - PARALLEL" savedTime="1308603240157">
  <parallel origin="rest" action="redeploy" filter="metadata.cluster='c1'">
    <sequential agent="agent-1" mountPoint="/sample/i001">
      <leaf agent="agent-1" fabric="glu-dev-1" mountPoint="/sample/i001" name="Run [stop] phase for [/sample/i001] on [agent-1]" scriptAction="stop" toState="stopped" />
      <leaf agent="agent-1" fabric="glu-dev-1" mountPoint="/sample/i001" name="Run [unconfigure] phase for [/sample/i001] on [agent-1]" scriptAction="unconfigure" toState="installed" />
      <leaf agent="agent-1" fabric="glu-dev-1" mountPoint="/sample/i001" name="Run [uninstall] phase for [/sample/i001] on [agent-1]" scriptAction="uninstall" toState="NONE" />
      <leaf agent="agent-1" fabric="glu-dev-1" mountPoint="/sample/i001" name="Uninstall script for [/sample/i001] on [agent-1]" scriptLifecycle="uninstallScript" />
      <leaf agent="agent-1" fabric="glu-dev-1" initParameters="{metadata={product=product1, container={name=sample}, cluster=c1, version=1.0.0}, port=9000, skeleton=http://localhost:8080/glu/repository/tgzs/jetty-distribution-7.2.2.v20101205.tar.gz, tags=[frontend, osx, webapp], webapps=[{monitor=/monitor, contextPath=/cp1, war=http://localhost:8080/glu/repository/wars/org.linkedin.glu.samples.sample-webapp-3.0.0.war}, {monitor=/monitor, contextPath=/cp2, war=http://localhost:8080/glu/repository/wars/org.linkedin.glu.samples.sample-webapp-3.0.0.war}]}"
            mountPoint="/sample/i001" name="Install script for [/sample/i001] on [agent-1]" script="http://localhost:8080/glu/repository/scripts/org.linkedin.glu.script-jetty-3.0.0/JettyGluScript.groovy" scriptLifecycle="installScript" />
      <leaf agent="agent-1" fabric="glu-dev-1" mountPoint="/sample/i001" name="Run [install] phase for [/sample/i001] on [agent-1]" scriptAction="install" toState="installed" />
      <leaf agent="agent-1" fabric="glu-dev-1" mountPoint="/sample/i001" name="Run [configure] phase for [/sample/i001] on [agent-1]" scriptAction="configure" toState="stopped" />
      <leaf agent="agent-1" fabric="glu-dev-1" mountPoint="/sample/i001" name="Run [start] phase for [/sample/i001] on [agent-1]" scriptAction="start" toState="running" />
    </sequential>
    <sequential agent="agent-1" mountPoint="/sample/i002">
      <leaf agent="agent-1" fabric="glu-dev-1" mountPoint="/sample/i002" name="Run [stop] phase for [/sample/i002] on [agent-1]" scriptAction="stop" toState="stopped" />
      <leaf agent="agent-1" fabric="glu-dev-1" mountPoint="/sample/i002" name="Run [unconfigure] phase for [/sample/i002] on [agent-1]" scriptAction="unconfigure" toState="installed" />
      <leaf agent="agent-1" fabric="glu-dev-1" mountPoint="/sample/i002" name="Run [uninstall] phase for [/sample/i002] on [agent-1]" scriptAction="uninstall" toState="NONE" />
      <leaf agent="agent-1" fabric="glu-dev-1" mountPoint="/sample/i002" name="Uninstall script for [/sample/i002] on [agent-1]" scriptLifecycle="uninstallScript" />
      <leaf agent="agent-1" fabric="glu-dev-1" initParameters="{metadata={product=product1, container={name=sample}, cluster=c1, version=1.0.0}, port=9001, skeleton=http://localhost:8080/glu/repository/tgzs/jetty-distribution-7.2.2.v20101205.tar.gz, tags=[frontend, osx, webapp], webapps=[{monitor=/monitor, contextPath=/cp1, war=http://localhost:8080/glu/repository/wars/org.linkedin.glu.samples.sample-webapp-3.0.0.war}]}"
            mountPoint="/sample/i002" name="Install script for [/sample/i002] on [agent-1]" script="http://localhost:8080/glu/repository/scripts/org.linkedin.glu.script-jetty-3.0.0/JettyGluScript.groovy" scriptLifecycle="installScript" />
      <leaf agent="agent-1" fabric="glu-dev-1" mountPoint="/sample/i002" name="Run [install] phase for [/sample/i002] on [agent-1]" scriptAction="install" toState="installed" />
      <leaf agent="agent-1" fabric="glu-dev-1" mountPoint="/sample/i002" name="Run [configure] phase for [/sample/i002] on [agent-1]" scriptAction="configure" toState="stopped" />
      <leaf agent="agent-1" fabric="glu-dev-1" mountPoint="/sample/i002" name="Run [start] phase for [/sample/i002] on [agent-1]" scriptAction="start" toState="running" />
    </sequential>
  </parallel>
</plan>
Finally, issue the command:
./bin/console-cli.sh -f glu-dev-1 -u admin -x admin -a -p undeploy
which will undeploy all apps.
Executing an arbitrary shell command
In the console, click on the 'Agents' tab, then click 'agent-1' and then the 'Commands' subtab.
Enter uptime in the text field and press return on your keyboard or click on Execute

What happens here is (like the ps section previously), the command you enter in the text field will be executed on the (remote) agent and the result will be displayed in the console.
Note
It can be any shell command supported on your agent, including pipes, redirects, etc... Simply try another command like env|sort (you will need to click the [...] to see the full output).
Viewing the audit log
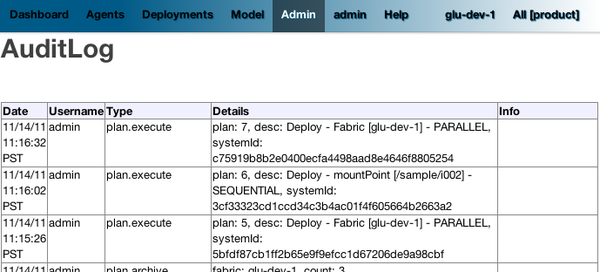
Go back to the console and click the 'Admin' tab and then select 'View Audit Logs'.
You should be able to see all the actions that you have done in the system (usually all actions involving talking to the agent are logged).
The end
You should go back to the original shell terminal (the one where the tail command should still be running), issue a CTRL-C to stop the tail and issue:
./bin/tutorial.sh stop
which will stop the console, the agent and ZooKeeper.
Note
if you did not undeploy the apps, as previously mentionned in Using the console cli section, they should still be running and this is on purpose: the lifecycle of the apps installed by the glu agent is independent from the agent itself. You can restart the tutorial (./bin/tutorial.sh start) and continue where you left off!